Smart Stop Installation Guide
You do not need to be Technical to install these products

Tools Reqd.
Screwdriver, pliers/cutters
Difficulty rating scale 2 out of 10
For Versions Standard, Delay and Intelligent
I. Description
Applying your brakes will cause your existing third brake light to blink rapidly approximately 6 times and then stay on solid as long as you have your foot on the brake pedal once you release the brake the unit then resets.
II. Features
- Size: 1" x 2" x 0.5" (26mm x 51mm x 13mm)
- Operating Voltage: 12 Volts DC
- Operating Temp: -30ºC to +70ºC
- Max Power Rating 6amps
- Max Power Consumption: 1W
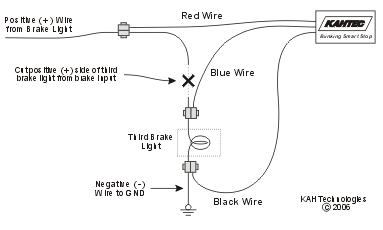
III. Circuit Diagram
new version

IV. Installation
- Locate access to the third brake light wires. The easiest access to them is from where you
change the existing bulb or LED bar. - Place a “Quick Connect” connector over positive (+) side wire going to the third brake light
and insert the Red wire. Using the pliers, squeeze the metal splice to secure the wires and then
snap the cover closed. - Place a “Quick Connect” connector over the same positive (+) side wire going to the third brake
light but between where you attached the Red wire and light. Insert the Blue wire and squeeze and
snap as before. - Place a “Quick Connect” connector over the negative (-) side wire (any chassis ground) and insert
the black wire. Squeeze and snap as before. - Cut the positive (+) side wire between where you attached the Red and Blue wires from the
Smart Stop. - Bond the Smart Stop inside somewhere out of the way with double-sided tape away from areas
of high temperature, moisture and water leakage.
Click here to view pdf version.

